


From Prototype to Injection Mold: The Complete Product Development Workflow
Jul 24
5 min read
If you've worked on hardware, you know the moment. The design is locked, the CAD looks right, and now you're facing the real question: how do you turn a STEP file into an injection-molded part you can manufacture, assemble, and ship at volume?
Getting there means moving through prototype validation, design refinement, tooling, mold trials, and mass production. Knowing when to move from one stage to the next is where a lot of first-time projects get stuck.
Here's how that path plays out; see how SG PROTO delivers a seamless one-stop service from initial prototype to a production-ready injection mold.

Stage 1: Prototype Validation (1-2 rounds, typically 3-7 days each)
The only goal at this stage is catching design problems as early and as cheaply as possible. You're not trying to match a production part exactly. You're trying to move fast and get real answers before committing to tooling.
CNC machining works best for structural parts, cosmetic parts, or anything that needs real mechanical testing. Tolerances can hold down to ±0.05mm, and materials like ABS, PC, aluminum, or POM get you close to production-grade properties, good enough for assembly checks, drop tests, and load testing. The tradeoff: complex internal features like deep pockets and undercuts drive up machining cost, and thin walls are prone to warping.
SLA/SLS 3D printing works best when geometry gets complicated: internal cavities, organic shapes, or several design variants needed fast for comparison. SLA gives a clean surface finish, good for cosmetic review. SLS uses nylon-based materials with decent mechanical strength for functional testing, and it doesn't need support structures, so complex geometry is where it actually has the edge.
Vacuum casting makes sense once you need a small batch of identical units, say 5 to 20 pieces for customer samples or a trade show. It's far more cost-effective than machining each one individually. Silicone molds cast in polyurethane get surprisingly close to injection-molded look and feel, with about a one-week turnaround.
Budget for at least two rounds of iteration here. Get the first batch of prototypes, run through fit, finish, and function issues, revise the CAD, and confirm with a second round. It's a lot cheaper than discovering the same problems after tooling starts. Mold modifications after the fact can easily run into the thousands of dollars.

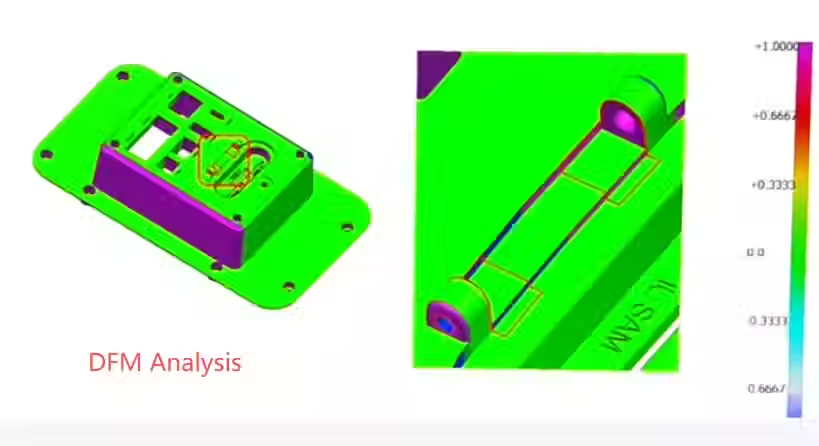
Stage 2: DFM Review, the Bridge From Prototype to Injection Mold
Once the design is locked, don't just hand the 3D files to a mold shop and say "go." There needs to be a formal DFM (Design for Manufacturability) review in between. This step gets skipped or rushed more often than it should be, and it's usually the single biggest factor in how smoothly the rest of the injection molding process goes.
A proper DFM review checks:
Wall thickness consistency. Uneven walls cause uneven cooling, which shows up as warping and sink. Keeping wall thickness variation within a reasonable range, material- and geometry-dependent, matters more than people expect.
Draft angles. Vertical walls with no draft will drag or scuff during ejection, and textured or grained surfaces need even more draft than a smooth finish would.
Rib and boss design. Ribs that are too thick relative to the nominal wall will telegraph as sink marks on the visible surface. A common rule of thumb keeps rib thickness around 50-60% of the adjoining wall.
Undercuts. Decide whether they need a slide or lifter, or whether the design can be revised to avoid them altogether. Slides and lifters add both tooling cost and long-term maintenance.
Parting line placement. Keep it off critical cosmetic surfaces, or route it along an edge where it won't be noticeable.
Getting this step right saves a disproportionate amount of rework later, at the mold trial stage. The best approach isn't just waiting for the mold shop to flag issues. Get the design team and the tooling team on a call, go through the model feature by feature, and document the reasoning behind each change. That record saves a lot of back-and-forth once the part is in production and questions come up.
Stage 3: Mold Design and Manufacturing (4-8 weeks, depending on complexity)
Once DFM is signed off, tooling begins. A few decisions here shape both cost and lead time for the rest of the project.
Mold configuration. Single-cavity tooling is cheaper and faster, and makes sense for validation runs or lower-volume orders. Multi-cavity molds, two, four, or more, bring per-unit cost down but require a bigger upfront tooling investment, worth it once volume is confirmed.
Mold steel and life expectancy. Match the steel grade and hardening process to your projected total production volume. A few thousand units and a few hundred thousand units call for very different tooling specs. Being upfront about expected lifetime volume avoids either overspending on tooling or having a mold wear out mid-program.
Mold structure. Gate location, runner design, and cooling channel layout all directly affect shrinkage consistency, cycle time, and cosmetic quality. Hot runner vs. cold runner is another call that depends on part geometry and volume. Hot runners cost more upfront but cut material waste and cycle time.
Most mold shops will run a mold flow analysis at this stage, simulating fill pattern and predicting shrinkage and air traps before any steel gets cut. That report is worth reviewing closely. It catches problems that are far cheaper to fix on paper than in steel.

Stage 4: Mold Trials (T0/T1/T2)
Finishing the mold isn't the same as being ready for production. There's usually a round of trials before that.
T0, first trial. Confirms the mold can actually produce parts, and checks for obvious defects: sink marks, flow lines, flash.
T1. A second round after adjustments from T0, focused on dialing in critical dimensions and fit.
T2 and beyond. Additional rounds as needed, until every dimension, cosmetic requirement, and functional spec checks out.
Every trial should come with a real inspection report, CMM data on critical dimensions, not just a visual "looks fine." When a dimension is out of spec, figure out whether the tooling or the process parameters are causing it. The same mold can produce different dimensional results depending on melt temperature, hold pressure, and cooling time, so it's worth ruling out process settings before deciding the steel itself needs rework.

Stage 5: Mass Production and Ongoing Quality Control
Once trials pass and the customer signs off on PPAP, or an equivalent production release, full production begins. The focus shifts from "can we make this" to "can we make this consistently."
First article inspection (FAI) combined with sampling inspection, typically to an AQL standard.
Mold maintenance logs: cavity cleaning and wear-part replacement, ejector pins and slides, tracked on a schedule.
Material lot consistency: even the same resin grade can show slight shrinkage variation batch to batch, so incoming material checks matter for long-term dimensional stability.
Typical Timeline: Prototype to Production
For a moderately complex plastic part, from prototype sign-off to production release, a common industry timeline looks something like this:
Prototype validation (1-2 weeks) → DFM review (3-5 days) → Mold design and machining (4-6 weeks) → Trials and rework (1-3 weeks) → Production ramp-up (1-2 weeks)
That puts the full cycle around 8-12 weeks, though it shifts depending on part complexity, cavity count, and how many trial rounds are needed. Spending an extra week on prototyping and DFM upfront routinely saves two or three weeks downstream in tooling and trials. Most teams who've been through a production run once will tell you the same thing.

If your project is at the prototype stage or you're about to start tooling, we can help with everything from Prototype to injection mold. Send us the 3D files. We can put together a DFM review first and flag anything worth fixing before cutting steel.
Comments